How to offer Newsletter subscriptions to your blog reader?

Newsletter is the great way to inform your blog readers about any updates to your site. You may just send out a message to collect their opinion. Google friend connect provides any easy way to send out the newsletter to all the members of your site. However, to use this method effectively you need to have some good number of followers who has subscribe to your newsletter. 

Step 1 : Go to www.google.com/friendconnect and login with your Google (Blogger) account username and password.

Step 2 :You will see the page as below.
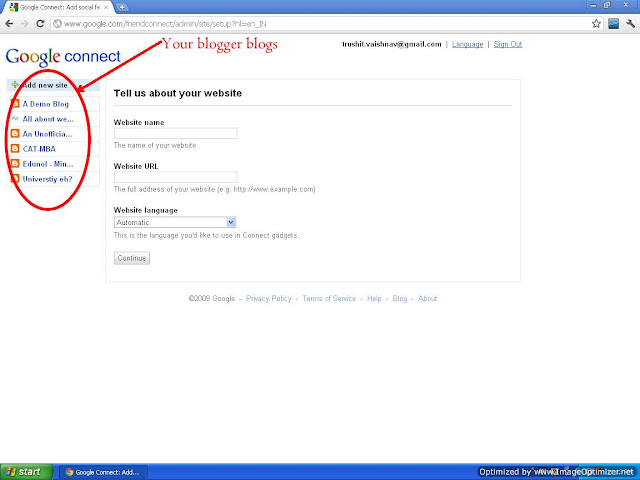
How to offer newsletter subscription to your blogger blog reader?


Step 3 : You should see your blog listed on the sidebar as shown in the above figure. However, if you can't see the blog, you can use the form "Tell us about your website" to add your blog/website to the list.

Step 4 : Once you have your blog listed in the list, click on the blog for which you want to send a newsletter.Following page should appear on your screen.
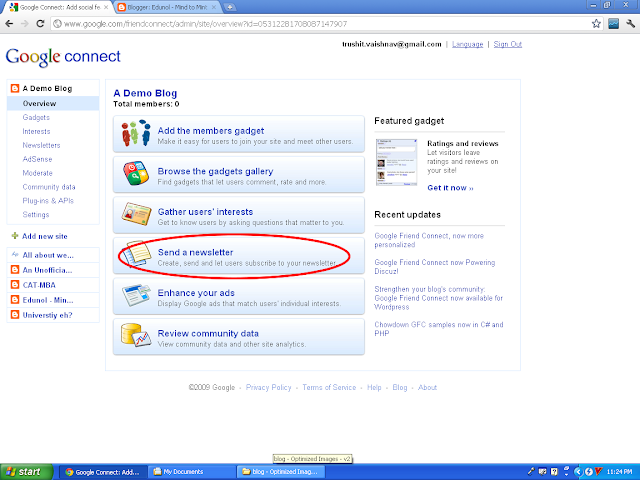
How to add newsletter gadget to blogger blog?


Step 5 : Click on Sean a newsletter. Than Go to Newsletter Gadget. Also select the desired colors so as to make them suit to your blogger template.

How to add newsletter gadget to blogger blog?

Step 6 : Specify the Headline text, Standard text and width of newsletter gadget.

How to offer newsletter subscription to your blogger blog reader?

Step 7 : Click Generate Code. This will generate code for your newsletter gadget for your blogger blog.

How to offer newsletter subscription to your blogger blog reader?


Step 8 : Copy and paste this code in the HTML/Javascript Gadget in your blogger Blog.

Still have any doubts?? Check out this video walk through!


Related:

How to send Newsletter to your blog reader?
How to add any external widget in blogger blog?

How to enable read more feature in blogger?

If you want your users see number of posts title instead of one long post, this feature would be useful to you. Blogger has a ability to add read more link at bottom of the page in just one click. You can let your users see few initial lines of text so that you can they get get the idea about what your post is all about. If they wish to read rest of the part, they can simply click on "Read More" and enjoy the entire post.

Below is the video walk through that should help you to enable this feature:

How to know where your YouTube video is embedded?

YouTube allows users to choose the option to control the sharing of their videos. However, most of the users allow sharing of videos so as to get more views. But if you are serving ads on YouTube it becomes important to track where your videos are getting shared.

YouTube has this little known facility to do this. YouTube allows you to view the sites from where you are getting the views. So if you are not getting any views from the particular site you might not see it on the list. But at least you can get the idea about where your video is being viewed. 

This can also help you to protect your AdSense account. See the screencast below:


If you find this useful, kindly take a moment to subscribe to my blog and youtube channel. Also constructive criticism is always welcome.

How to add custom image in the header of your blogger blog?

Blogger provides variety of templates that you can use. You can change your templates easily. But if you want to give unique look to your blog, adding custom image as your header is one of the best ways. Header is one of the entity that catches user eye. So if it is unique, entire blog seems to be unique. A bit tweaking of other part of blog will give rise to complete unique look.

So let us jot down the steps about how to add unique header to your blog....

Step 1: Create a image of proper size. (How to adjust width of blogger blog?)

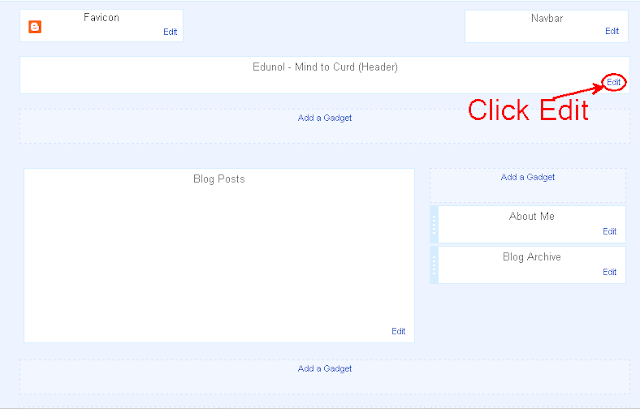
Step 2: Go to blogger layout section. You will see the following image.


Step 3: Click Edit. And then choose the correct file from link below.


Step 4 : Choose the desired image from your computer. You may also put the URL of the image. Choose the Placement Option and click save.

Still have doubts. See the screen cast below.


A website that runs ONLY without internet!


Who else can do such miracle? RAJNIKANT of course! When you visit a website www.allaboutrajni.com you are welcomed with the following message

He is no ordinary man, this is no ordinary website. It runs on Rajini Power
Further users are advised to switch off the internet. This is no joke. Website indeed runs without net connection. This was a tribute to legend Rajnikant from Webchutney. Director of webchutney and founder of desimartini.com.

Website has a background music and appearance that matches Rajnikant personality. Website works on some complex algorithms running in the back-end that keeps an eye on the propagation of data packets between two terminals. The best part is that if you try to connect your net again you get the message:

"Aiyyo! That was unexpected. To keep browsing, switch off your internet," 

So Rajnikant has also made his presence and got his name linked to first web site that runs withOUT net! 

Why I cannot see thumbnail of my YouTube video on Facebook?

When I tried to embed my video "how typical Facebook spam works" on my Facebook wall. I could not see the thumbnail of the video. All I could see was the link to my YouTube video. This was really something I did not want to do. I wanted people to see video on Facebook. I really don't know if the issue is/was on YouTube site or Facebook site but I could find a solution to this problem.

You can do two things. Either use some other browser. I was using Google Chrome. I could not see the thumbnail with Google Chrome. So I tried with Firefox and I was done. Later again when I tried with chrome I faced the same issue. So I cleared the browsing data, cache ,cookies etc. I tried again and bingo! It worked!

So either use some other browser or clear the browsing data. I think latter one is better. Please post your opinions in comment area. I will be posting the screencast of this soon!

Google announces Page layout algorithm improvement

When Google Panda algorithm update came in, there were several notions about the above the fold concept. If there is less content above the fold Google will penalize such sites now onwards. Such sites may lose ranking in SERP's.  If you click any link to the website and you see the page plastered with promotions and banners it can be annoying to users and leads to poor user experience. This is yet another Google's effort to provide better search results quality.

Matt Cutts of the official webmaster blog said that this algorithmic change won't affect those sites that display ads to normal degree. But going too far can lead to penalty. But in my opinion ads should never be the part of your main content. One should put them in side banners so that you are not annoying your users.

Google recommends using browser size tool to see how your website would look under different screen resolutions. You can also know about above the fold tool.

It would be interesting to know if Google penalize itself or follow their own algorithm update. Most of the times Google displays "sponsored links" in the search queries. Though they may say user might be interested in those links but I guess it is not always so. See the image below.

Google page layout algorithm

How to find real time Insights using Google insight finder?


Google Business launched Google insight finder that would help business people to know about the scope of their product before launching it. It helps them to get the in-depth analysis about the way tread has been and how it has been changing.

Google insight finder answers four important questions for any business market analysis:

  1. What are people looking for?
  2. How are people searching for it?
  3. Where are people clicking?
  4. What are people saying?
  5. What are people watching?

As web has getting exposed more and more to people each day, it accurately describes people interest. Keeping this in mind business managers can use online tools to collect data about their market space quickly and efficiently.

Suppose you want to know about the ice cream brand that you are planning to launch. Google insight finder will answer the above questions in minutes. You can see the treads about searches for ice cream world wide and obviously you will see that ice cream related searches where at peak during summers. You may also get treads about specific region of the world. You can also get information about the particulr search queries that consist term "ice cream" like ice cream maker or "ice cream recipe". This also gives some indication about what people are planning to do? So go a step further - What are people saying? Answer to this will give you detailed information from various blogs, networks and videos where people share their ideas online. This will help you to know why people are looking for "ice cream maker". Lastly you may use adplanner to get information about some particular website related to you business.

Google has explained the usage of Google insight finder in the following video.

Adsense launches adsense publisher tool bar

Adsense has launched a Google Chrome extension that can help you track your adsense account is real time without going to www.google./adsense. This extension is one click solution to track your adsense earnings.

To have adsense publisher toolbar for your Google Chrome Browser follow the steps below:
  1. Visit the Chrome Web Store and download the Ad Sense Publisher Toolbar. This will add the toolbar icon to your browser.
  2. You’ll then need to grant the toolbar access to your Ad Sense account. To do so, click the toolbar icon and then sign in to Google Accounts with your Ad Sense login and password.
  3. Next, visit a website where you've implemented your ad code, and enable the toolbar by clicking on the toolbar icon again.
Toolbar enables us to get the following data easily
  • Account earnings summary
  • Top 5 custom channels
  • Top 5 URL
  • Lifetime revenue.
Note that finalized earnings can be bit lower than the earnings displayed.

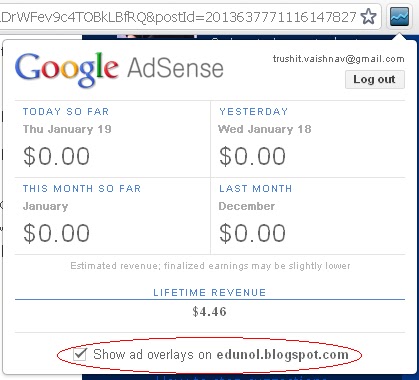
You can also have ad overlays directly on the ads which will tell you about the performance of that ad on that day, the day before and in past seven days. To enable overlays navigate to the site where you have implemented your code. Then click adsense publisher tool bar. You will see the option to enable overlays.


Thats it!


How to stop suggestions being displayed at end of YouTube video?

When we see any YouTube video, at the end YouTube displays suggestions for the user in which the user might be interested. Those videos can be from other channels. So it can drive traffic away from your blog or channel. Sometimes those videos are quite irrelevant and can make user exit your blog.

So what to do? Just switch off those suggestions! To switch those suggestions off you just need to tweak the embed code a bit.

Below is the video of Matt Cutts answer to a query.


Now embed code of the above video is 


<iframe allowfullscreen="" frameborder="0" height="315" src="http://www.youtube.com/embed/HSQzUixVCzo" width="560"></iframe>


All you have to do is add the blue colored code in it:

<iframe allowfullscreen="" frameborder="0" height="315" src="http://www.youtube.com/embed/HSQzUixVCzo?rel=0" width="560"></iframe>


This will disable related video feature is YouTube.

Better sharing gadgets and widgets for blogger blog

Blogger gives the option to use a sharing bar at a bottom of the page so that users of the blog can share the blog post they are interested in, on the various sites. This helps the blogger to drive traffic to his/her blog. However, gadget that blogger provides is a set of small bar like the one below:

This share bar is quite small. Further, we can not control its placement. And most important is..it is not attractive. We need to highlight the share bar so that people see that.

Following two are the free services that provide better sharing options.

Addthis: Easy to integrate and gives you ability to share the content on all the social websites. This helps you spread the word easily to tons of websites. It also provides in depth analysis of the traffic and audience. You get variety of sizes for the gadget.

Website : www.addthis.com


Shareaholic: I have not used this one as it does not integrate easily with blogger. We need a web host to use this. So I would simply discard this option. As such addthis works great for me. However you can find the tutorial to use Shareaholic with blogger here.


How to link to youtube channel or anyother webpage as if it is a part of blogger blog?


You can link to YouTube channel from the page tabs of your blogger blog. If you don't know how to add page, see this tutorial.

Now linking to YouTube or any other webpage is very simple. Just go to your dashboard. Go to pages. Click on new page.

Click Web address. You will see the following box.


Click save! You are done!

Now just preview your blog.


How to add "you might like" widget in blogger?


You must have seen many blogs that has a list of post or thumbnails at bottom of their post which links back to older posts. This makes user stay on the page for longer time. Also it enables us to keep our older posts "live". So in this tutorial we are going to see how we can add that facility to blogger blog.

Following are the free services that lets you enable you might like option:

Linkwithin : Linkwithin provide you is one of the better options that helps you to enable "you might like". It can be easily added to blogger and starts displaying suggestions quite soon. Only problem with linkwithin is, even after you delete your post, link within keeps showing it and later it throws an error page. This leads to bad user experience. But as it is free it is widely used by many bloggers. Linkwithin at times displays thumbnails (if graphic is available in the post) or it may display list of posts.

Outbrain : Outbrain is quite similar to Linkwithin. It is also free. But outbrain may also display links to other web sites. And outbrain pays you per click. So it can be one of the ways to monetize your blog. However, I persoanlly have not yet tried this. Nor I would try as it would lead to draining of traffic from my blog. Adding outbrain to blogger is easy and quick but it takes some time to provide suggestions. Also unlike linkwithin, in case of Outbrain we need to decide in prior if we want thumbnails or list of post. 

Simple reach : This provides "you might like" box at right bottom of the page. See this page for example.

Manual list : This is the best way to retain and engage traffic. You can always add links to your older post with the title "related". This is help you to provide extremely relevant links as you have to decide yourself. I use this method on this blog and it works great for me.

How to Embed youtube channels on your website?

Youtube is one of the best solution for hosting our videos for free. Later one can embed the youtube video to their website. But at times we want to embed our entire channel to the website so that people can subscribe to our youtube channel directly from our website in just one click.

Youtube provides facility to embed your channel to your website. Just copy the code below:

<script src="http://www.gmodules.com/ig/ifr?url=http://www.google.com/ig/modules/youtube.xml&up_channel=YourChannelName&synd=open&w=320&h=390&title=&border=%23ffffff%7C3px%2C1px+solid+%23999999&output=js"></script>


Replace YourChannelName with the name of your channel. And paste this code in the source code your site or blog.You are done!

How to connect your classic printers with Google cloud print?

To connect your classic printer with Google cloud print you will need:
  1. Google chrome. Download here.  
  2. If you are using microsoft XP you will need to download Microsoft XML paper specification pack.
Once you have Google chrome and Microsoft XML paper specification pack, launch your chrome browser.

Then follow the steps below:

Step 1 : Click on the wretch icon. Go to Options.
Step 2 : Go to under the hood. Scroll down to Google cloud print.
Step 3 : Click sign in to Google cloud print. You will see the printer confirmation page as below.


Step 4 : Click Finish printer registration. You will see the message as below:


You are done! See the video for detailed walkthrough: